Recent News
What to Do with Narrated PowerPoints?
March 17, 2015
Categories: narrated, powerpoint
If you’re like many faculty, you like the idea of narrated PowerPoints as a way to convey a lot of information to students in an easy and interactive format. However, the situation becomes more complicated when it comes to getting narrated PowerPoints online. Narrating a PowerPoint usually creates a huge file, which can cause problems for how to store the file online, as well for how it will play for students in an online environment. At this point there are a few options that you can consider when planning to move narrated PowerPoints online.
Note: If your goal is to create a multimedia product with an end result similar to the feel of narrated slides, but you have not yet committed to PowerPoint, there are also numerous mobile apps available for download that will also easily record narration to slides and/or screen recordings. For more information, see my articles on Flipping Your Classroom and Apps for Education.
If you already have narrated PowerPoint files or are committed to staying with PowerPoint, here are some options for getting your narrated presentation to work online:
Upload as Video into Canvas Studio
To go this route, the most important first thing to keep in mind is that you need to keep your video files at 10GB or less. If you have already created your narrated files, you may need to break them up into multiple smaller files. What I like about this method is that you do everything with the software you already have- PowerPoint and Canvas. I also like that it keeps your course materials in the same place, Canvas, rather than requiring you to load and then keep track of some of your material in a different system. Also, when you use Canvas Studio, the videos do not count against your Canvas course size quota!
Note: if you want to play embedded videos in your PPT, then this method will not work. You will need to choose one of the other options discussed- saving to Box or recording within Zoom.
- Open your narrated file in PowerPoint and choose “Save As.” Look at your Save As options. Depending on your version of PowerPoint, you should have a movie format (possibly .wmv, .mov, or .mp4). Choose to save your narrated file as whichever movie format option your version allows. This will give you a movie file and allow you to upload it into Canvas Studio, which you can then share directly in your Canvas course.
- Next, you will add the video to Studio. Go into your Canvas course and click on the STUDIO lefthand link. If you don’t see Studio in the list, go to Settings > Navigation and enable the Studio link.
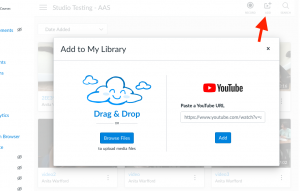
- When you click on Studio, it will open the Studio interface. You will click the “ADD” button in the top right corner. This will allow you to upload your video via drag-and-drop or by browsing your computer (note that you can also link to YouTube videos in Studio):
- Next, you will add your Studio video to your Canvas course. You can embed a Studio video anywhere in Canvas that uses the Rich Content Editor (RCE). So for example, in an Announcement or in a Canvas Page, you will look in the formatting buttons for the icon that looks like a “plug.” When you click that, find and choose Studio from the list of options that appears.
- This will take you to your Studio Library, where you can see all videos you have added to Studio. Click on the PPT video. Choose your embed options and then click EMBED:
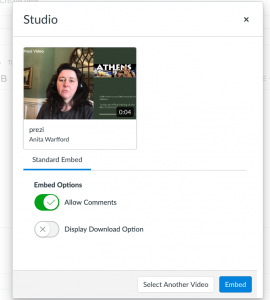
Your students will now be able to watch your narrated PPT as a video file inside the Canvas course. Note from the image above that you can choose whether to allow students to comment on the video and/or download the video.
Here is a link to the detailed instructions for using Canvas Studio.
Load Files as PowerPoint SHOW Files in Box
- Open your narrated file in PowerPoint and choose “Save As” and choose to save the file as a PowerPoint show (.ppsx). This means that when the file is opened, it will automatically open in a presentation mode and play audio.
- Login to your Box account and upload the .ppsx file into a folder. Box will not “preview” a PowerPoint show, so remember that students will have to download the file before viewing.
- Click the Share link beside the folder that contains your file(s) and copy the EMBED code for the file. Make sure that your other settings (such as expiration) are appropriate.
- Now, log into Canvas and create a Page under a Module. Edit the page and click the “HTML Editor” link. Paste the Embed code into the text box and Save.
- Box embedded inside Canvas may prompt you to log in with your UNCG credentials (even though you are already logged into Canvas) or drag a cloud into position on the screen as a security measure, but overall this method is reliable. Students should see a list of your Box files when they view the Canvas page.
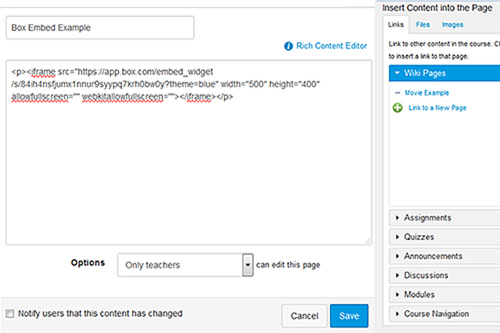
Paste the Box folder embed code in the HTML view of a Canvas Page.
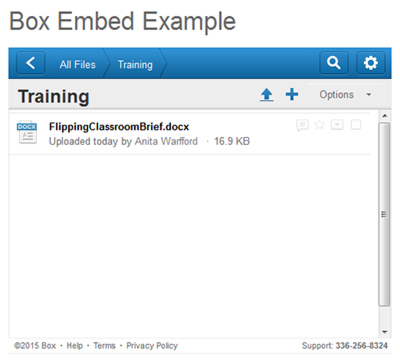
Once you have embedded the Box code, students will see a list of all files in your Box folder.
Record PPT Narration via Zoom
- Open your PPT file in PowerPoint.
- Go into your Canvas course and click on the Zoom link.
- Initiate a Zoom session. You can schedule a session in advance, but the easiest way to do this on the fly is to click on the tab for Personal Meeting Room. Scroll down, checking that the default settings are okay, and then click “Start This Meeting.” This will launch Zoom.
- You will click the SHARE button in Zoom and choose to share your PowerPoint. At the bottom of the share window you will check the option to Share Computer Sound. Then start the share.
- Click to start recording and choose to record to the cloud. Once recording begins, click through your slides one at a time, narrating as you go. You can play embedded videos and Zoom will capture them playing as well.
- When you are finished, stop the recording. After a few minutes, the recording will appear under the Cloud Recordings tab in the Zoom area of your Canvas course. You can click the toggle button to publish the recording so students can access it.


