Accessibility
What is Accessibility?
Under federal law, Section 504 of the Rehabilitation Act and Titles I and II of the Americans with Disabilities Act (ADA) are the applicable mandates for the university’s efforts to provide electronic accessibility to persons with disabilities.
From Section 504 of the Rehabilitation Act of 1973:
no otherwise qualified handicapped individual in the United States. . . shall, solely by reason of. . . handicap, be excluded from the participation in, be denied the benefits of, or be subjected to discrimination under, any program or activity receiving Federal financial assistance.
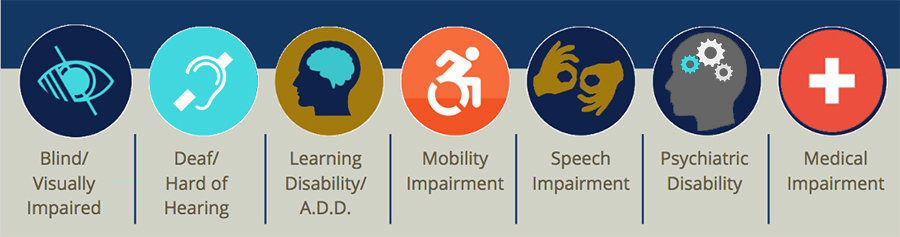
According to UNCG’s OARS office, there are seven general categories for disability related services:
WHY DO WE CARE? UNIVERSAL DESIGN FOR LEARNING (UDL)
- According to the National Center for Education Statistics (2016):
- The number of undergraduates in postsecondary education in the U.S. with a disability increased from 6% in 1999 to 11% in 2012, and there are almost 2 million disabled students nationwide.
- Students with disabilities are significantly less likely to earn a bachelor’s degree- 31% of disabled students earn a bachelor’s in eight years compared to 51.2% of non-disabled students, even though in 2015 the National Council on Disability reported that disabled students are attending higher education at roughly the same rate as non-disabled students.
- 5% of UNCG students have some form of learning disability and/or 29% have an attention deficit disorder; hearing impairments comprise 5% of our population, while 2% are visually impaired, 4% are mobility impaired, 14% have medical impairments, and 11% other health impaired. (According to OARS office)
- This is a large potential population to tap into for online courses.
- It’s the LAW.
However, accessibility is really about access, and so the conversation will be better served to focus on Universal Design for Learning (UDL), where accessibility for disabled students is one part of the larger effort toward making online content more accessible for all users. As described in Tobin and Behling (2018), Universal Design for Learning is “an approach to the creation of learning experiences and interactions that incorporates multiple means of:
- engaging with content and people
- representing information, and
- expressing skills and knowledge” (p. 2)
It can help your understanding of UDL to consider curb cutouts, escalators, and extra wide entryways. All these things accommodate someone with a wheelchair, but they are also helpful for those with strollers, large items such as luggage, shopping carts, and moving furniture. The same concept can apply in learning. Universal Design for Learning aims to reduce learning barriers for everyone, including but not limited to those with specific disabilities.
WHO IS RESPONSIBLE FOR ACCESSIBILITY COMPLIANCE?
Instructors should be able to provide a compliance statement on their syllabi (examples of which can be provided), use correct formatting/markup for text, adhere to guidelines for color contrast, write alternate text for images, and use correct markup language for equations. In addition, instructors are responsible for confirming accessibility compliance when using outside/publisher content and arranging an alternate method for content that cannot be made compliant. Finally, instructors complete the process for video captioning, with assistance as needed from the ITC.
Academic Technology Specialists provide both face-to-face and online training and documentation related to accessibility. Additionally, the ITC can perform an accessibility check on course content, assist with compliance for advanced media, and suggest alternate methods of presentation/assessment for content that cannot be made accessible.
The Office of Accessibility Resources and Services (OARS) approves students who request accommodations and informs instructors. The OARS office will also facilitate the acquisition of compliant textbooks and P.D.F. files, and work with instructors to arrange for translators or live captioning for a class.
Learn how to Create an Accessible Course & Classroom
Now that you have been introduced to the importance of accessibility in learning, explore the tabs below for useful information and resources.
TEXT & LINKS
Your Syllabus
Place an accessibility policy statement on your syllabus. Note that it is the student’s responsibility to register with and request accommodations through the O.A.R.S. office. The OARS office will then contact you. The following is an example statement faculty should include on syllabi:
UNCG seeks to comply fully with the Americans with Disabilities Act (A.D.A.). Students requesting accommodations based on a disability must be registered with the Office of Accessibility Resources and Services (OARS) in 215 Elliott University Center, 334-5440, oars.uncg.edu.
Also, keep in mind universal design principles when formulating your learning objectives. For example, change “students will demonstrate effective oral communication skills..” to “students will demonstrate effective communication skills..” This statement is inclusive of students who might be deaf. You can then design or modify the assignment to allow students to demonstrate the relevant communication skills for their situation.
Text
The Canvas rich content editor is the visual interface you see throughout Canvas that provides formatting buttons for basic content. It has many built-in tools to assist you in creating compliant content in Canvas:
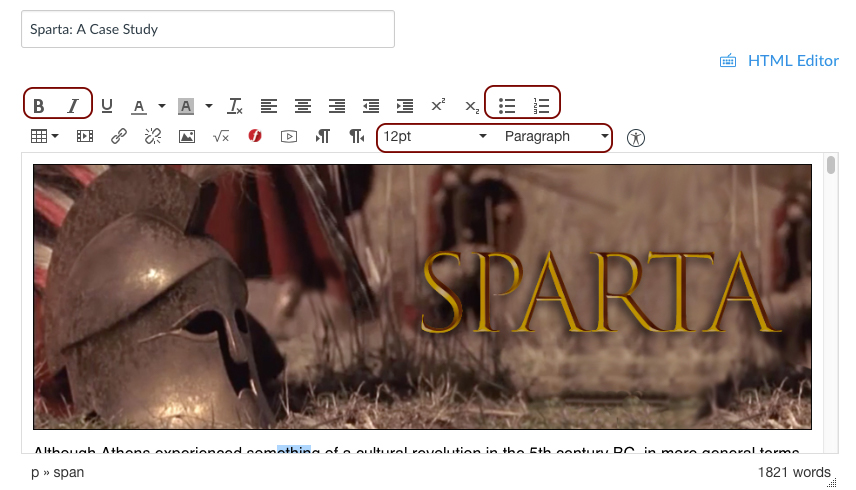
- Use built-in paragraph formatting, including heading styles. This helps text readers designate the order/hierarchy of the content. H1 is generally reserved for the Page Title/Name, and then h2 would be used for section titles/headings. H3 could be used for sub-section headings. In Canvas, once you have designated text appropriately, you can then still highlight that text and change other options such as bold, italics, text color and size.
- Use real bullet and number lists. The Canvas rich content editor allows you to easily highlight text and then click either the icon for a bulleted or a numeric list.
- Avoid abbreviations and acronyms
- Sans-serif fonts are generally easier to read on a screen
- Do not rely on color to convey meaning; colors should have enough contrast to account for color blindness
- Avoid flashing text (People with photosensitive epilepsy can have seizures triggered by flickering)
- Use tables only to display data; avoid using tables for layout purposes- the cells are read in the order in which they appear in the HTML source code. This is not necessarily the order in which the text is laid out on the screen.
Resources:
Adding Links in a Canvas Content Page
- Avoid generic phrases like “click here” and “more”
- Use descriptive text for the link instead of the actual URL. A screen reader will read the entire URL.
- Good Example: Juicy Studio Colour Contrast Analyser
- Listen to a screen reader read a URL as link
- Listen to a better example of link text
To make a link to a file in Canvas:
- Edit a Content Page.
- Type some descriptive text for your link.
- Highlight the text you typed.
- Go to the Files tab at right and click on the name of your file to create a link.
- See video: https://www.youtube.com/embed/j99sJGlQC6o
OR, for a weblink:
- Highlight the descriptive text, then click on the link icon box in the text editor
- Paste the actual link in the URL field
- Click the “insert link”button and save and publish your page.
PDF, WORD, & POWERPOINT
PDF Files
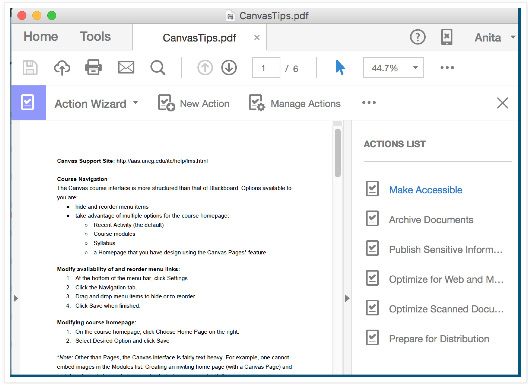
Try to avoid scanning printed documents- this often results in the pages being seen as images instead of text. Acrobat Pro has an accessibility tool that will generate an accessibility report, set alternate text, and determine reading order. You can access Adobe Acrobat’s accessibility tools either by clicking on the EDIT menu and choosing Accessibility Setup Wizard, or going to Tools and selecting Action Wizard. From the Action List, choose Make Accessible.
Images will need ALT text. This is best if done in the document’s native format, such as Word. Information on ALT text is described on the “Images in Canvas” tab above.
Whenever possible, use Word documents instead of PDF files- accessibility tools in Word are easier to work with, and Word is often more screen reader friendly.
Resource: Accessibility in Adobe Acrobat
Word Files
- Use the built-in Accessibility Checker. Click on “Review” and select “Check Accessibility.” The results of the check will appear to the right of the document.
- Follow all guidelines for accessible text, and make link text meaningful in relation to the page being linked. Use the format options for bulleted and numbered lists.
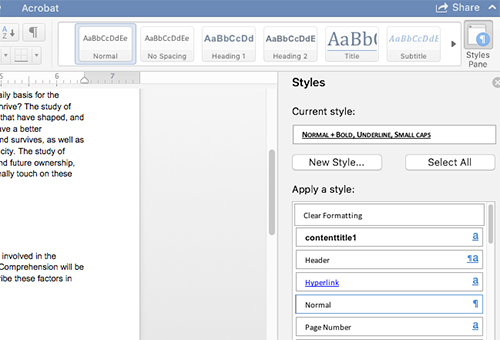
- Use built-in headings and styles: on the HOME tab, the styles group shows at the top right. You can also click the Styles Pane button to see options load along the right side of the document:
- Include alternative text with all visuals: right-click on the image and choose “Edit Alt Text…” A text box for entering alt text will appear at right. You may also see a box you can check to “Mark as decorative”- check this box if the image adds no informational value to the slide. More information on ALT text is included on this site in the next section, “Images in Canvas.”
- Ensure that color is not the only means of conveying information.
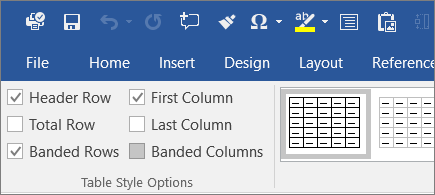
- Use a simple table structure, and specify column header information. When you insert a table, on the Table Design tab, check the box for “Header Row” if you just need to designate the top row; also check “First Column” if that will be used for heading information as well.
For detailed information on how to implement these recommendations, see: Microsoft’s Make Your Word Documents Accessible
PowerPoint Files
- Use a slide template when possible, and follow the guidelines for accessible text.
- Give every slide a unique title.
- Apply ALT text to images: right-click on the image and choose “Edit Alt Text…” A text box for entering alt text will appear at right. You may also see a box you can check to “Mark as decorative”- check this box if the image adds no informational value to the slide. More information on ALT text is included on this site in the next section, “Images in Canvas.”
- PowerPoint has a built-in accessibility checker that will also provide suggestions. Click on “Review” and then click on the “Check Accessibility” icon. The results of the check will appear to the right of the slides.
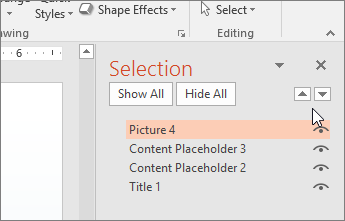
- Especially if you aren’t using a slide template, you should make sure that the items on your slide will read in the correct order (slide order). On the Home menu, click “Arrange” and then choose “Selection Pane.” This pane will appear at right and will list all the items on your slide. Drag and drop the items into the correct reading order.
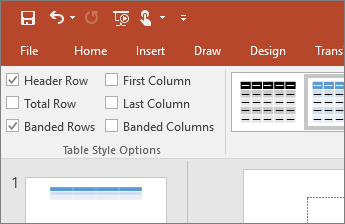
- Tables- tables should have header rows. When you insert a table, on the table design tab, check the box for “Header Row” if you just need to designate the top row; also check “First Column” if that will be used for heading information as well.
- Use Speaker Notes to clarify and/or elaborate on any material on the slide that is not fully explained.
- Use captions for embedded video and provide a transcript for embedded audio. Captions for videos in PowerPoint can be problematic, so Microsoft recommends you insert videos that already have captions embedded.
- Options may be slightly different in Office 365 online.
Resources:
IMAGES IN CANVAS
Alt Text in Canvas
Images must contain ALT text, which is text that meaningfully describes the image. The ALT text is read by screen readers in place of the image. Text must describe the image content in enough detail that a blind person can understand whatever concept the image presents. Generally, it is best to keep ALT text limited to one clear sentence with no more than 120 characters. The Canvas Accessibility Checker will prompt you to fix any alternate text that has more than 120 characters, including spaces. If you have an image that conveys very complex information, such as a map or graph, consider typing the description of the image directly on the content page. This way, you won’t be limited to 120 characters, and all of your students can benefit from the added description. If you do this, then you can check the box that the image is decorative only (see below).
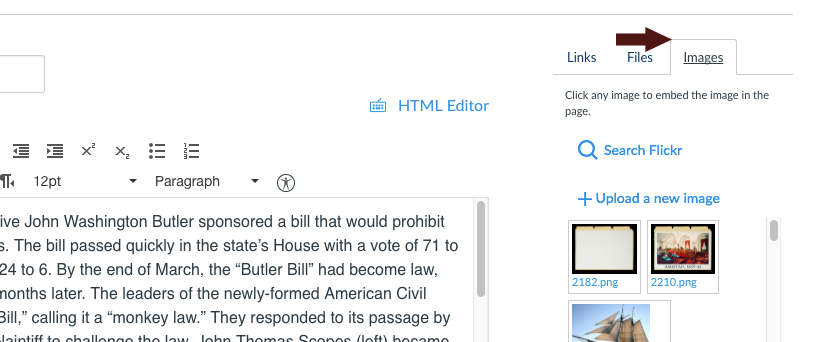
Canvas will prompt you to enter ALT text for an image when you use the “Image” tab to the right of the screen on a Canvas Content Page. Click on the “Image” tab at right and then click to “+Upload a new image.”
You will be prompted to browse your computer for the image you want to insert. Once you have selected the image from your computer, you will see the following:
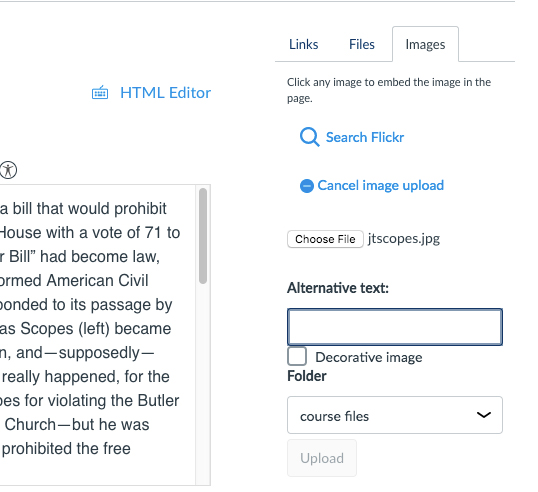
The ALT text field is where you type the descriptive text.
Note: Sometimes, images are used for primarily decorative purposes and don’t add any relevant information to the content of the page. In these cases, instead of typing ALT text, you should only click the checkbox for “Decorative Image.” It is not enough to leave off alt text altogether, because some screen readers will still read the image file name.
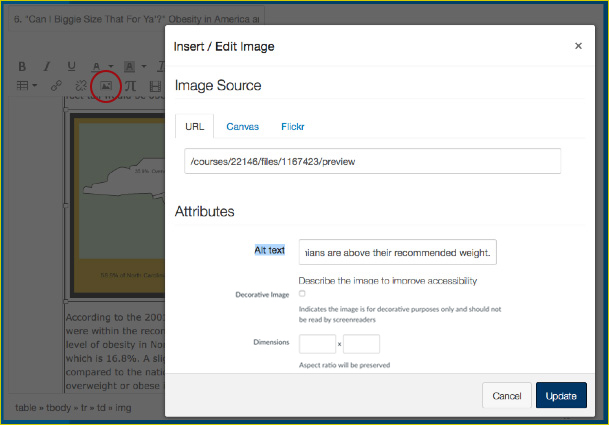
To insert ALT text for an existing image in Canvas, first go to edit the page, announcement, etc where the image is located. Click on the image to select it, and then click the image icon in the formatting tools (circled in red in the image below); type your ALT text in the box. If the image is decorative only, click the checkbox for decorative image, so that they can be ignored by assistive technologies, such as screen readers.
Tip: You can also add alt text to images in PowerPoint and Google Slides. In PowerPoint, click on the image and the Format Picture options will appear at right. Click on the third tab (Size & Properties) and you will see Alt Text as an option. Enter your text in the description area. Image Title is optional- not all screen readers read it; the title sometimes shows when your mouse hovers over an image. Titles should be short. In Google Slides, click to select the image, then go to Format > Alt text.
Resource: Writing Great ALT Text
EQUATIONS
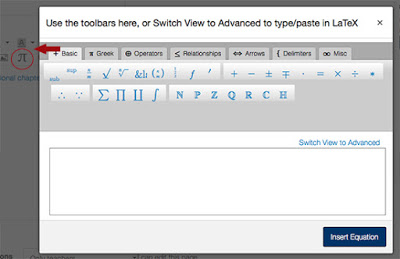
Additionally, some people use images of equations in their learning materials. However, when an appropriate markup language exists (such as MathML) use markup rather than images to convey information. Canvas has the option to insert an equation. The image below shows Canvas’ equation editor:
QUIZZES IN CANVAS
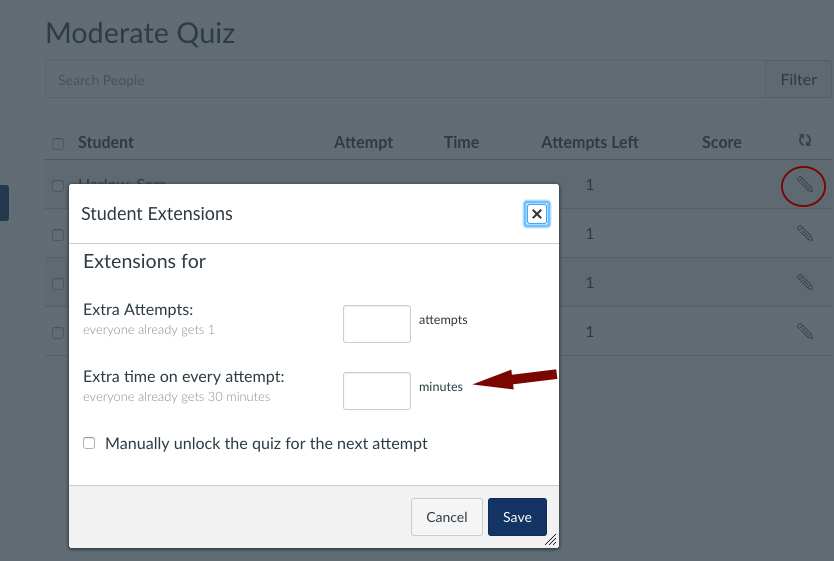
One of the most frequent disability accommodation requests from students is to have additional time on timed quizzes. To grant additional time on a quiz in Canvas: click on the quiz name, then click the “Moderate this Quiz” link at right:
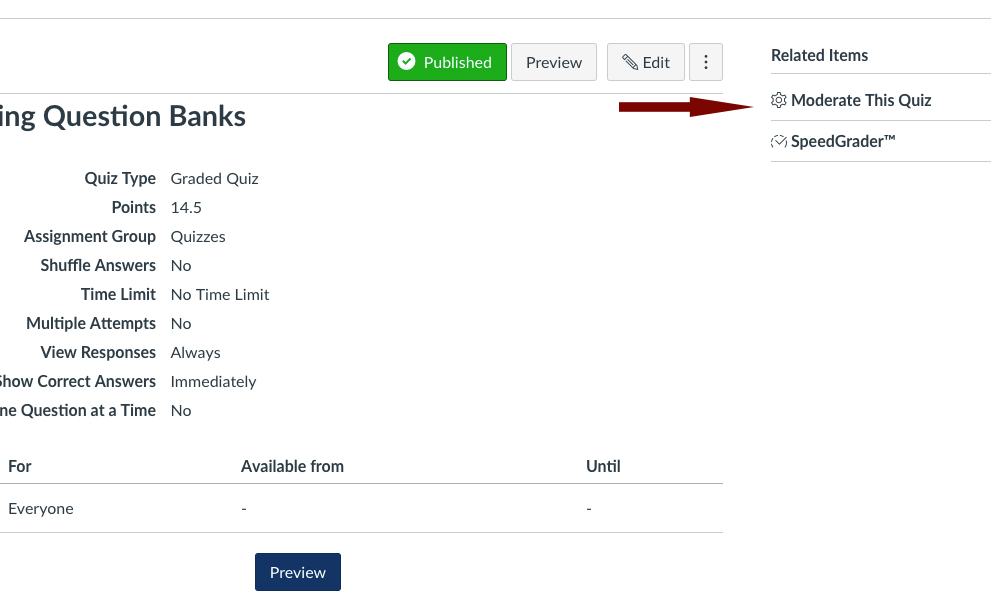
Next, click the edit icon to the right of a student’s name. You can grant additional attempts as well as extra time for the quiz. For example, if everyone already gets 30 minutes to take the quiz, and a student is approved for an additional 15 minutes, you would enter “15” in the “Extra time on every attempt” box.
VIDEO IN CANVAS
Video has become a popular way to add content to online courses, and Canvas makes it very easy to record and upload video. However, it is important to realize that all video must have closed-captioning, and ideally a transcript as well. Closed-captioning overlays text on the video, and this addresses the needs of hearing impaired students who watch the video. However, you might also have a visually impaired student in your course. In this case, captioning does little to help- the student needs a transcript of the video to be read aloud. A transcript needs to include not only what is said, but it needs to also describe any relevant action in the movie as well. This could mean a description of what the characters are doing, or it could mean a detailed description of a chart that appears in the video. The transcript must be detailed enough that the student can understand not just what is being said in the video, but also what is happening in the video.
A transcript is most often just a text or html file that is linked on the page with the video. There isn’t a good tool available for us to use for creating a transcript- generally you either type it yourself or hire a transcriptionist. There are however a few options for addressing closed-captioning in your course:
SUBMIT A REQUEST FOR CAPTIONING:
For several years the Provost’s Office has set aside some funds for closed captioning services. When funds are available, you can submit a request form and share your videos, and they will be sent to an outside company for captioning. Contact your Instructional Technology Consultant for more information about this option.
YOUTUBE:
Everyone at UNCG has a YouTube channel. Even if you don’t plan to leave your video on YouTube, you can upload it temporarily because YouTube will automatically generate captions for most videos. However, keep in mind:
- Use for your own videos, not copyrighted clips
- Video must be good quality audio and set to public or unlisted
- Quality of captions varies, and will likely need to be edited
Once your captions have been generated, you can leave it the video on YouTube and link or embed the video in Canvas. OR, you can download your video and captions files and upload them directly into Canvas.
Resource: YouTube via Your iSpartan Account
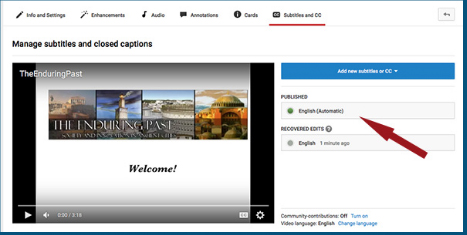
To Edit your YouTube Captions:
- Go to Video Manager. Click the drop-down arrow beside the video and choose “Subtitles and CC.”
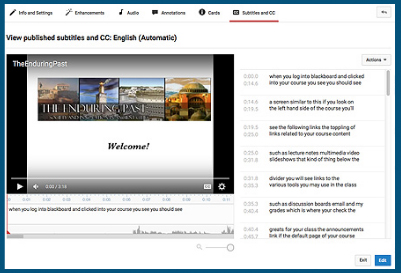
- When the page loads, under “Published” you should see “English (Automatic).” Click that.
- The captions will load. Click “Edit” at the bottom and make adjustments to the captions and save.
LIBRARY STREAMING VIDEO SERVICES:
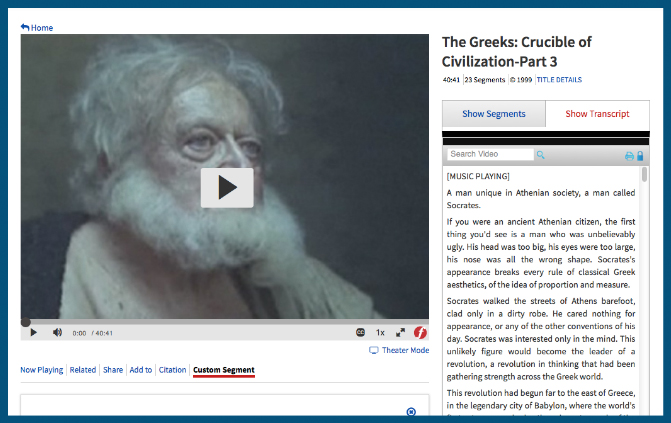
Jackson Library offers approximately 10 extensive video catalogs to search. These videos can be either linked or embedded within Canvas. The streaming catalogues allow you to use commercial videos without worrying about copyright violations. One important note is that for some videos you have to specifically request closed-captioning, which could take awhile to process, so plan early. Some of the videos also provide transcripts.
Here you can see an example from Films On Demand, one of the Library’s streaming services:
Resource: Jackson Library’s Streaming Media Guide
AMARA
Amara is a video captioning tool that is integrated with Canvas.
- First upload your video into a Canvas page by clicking the “Record/Upload Media” icon in the text editor.
- Submit to save your Page.
- Once you have uploaded the video and saved the page, click on the page to view the video.
- Click the pause button and look for the “CC” icon in the play bar.
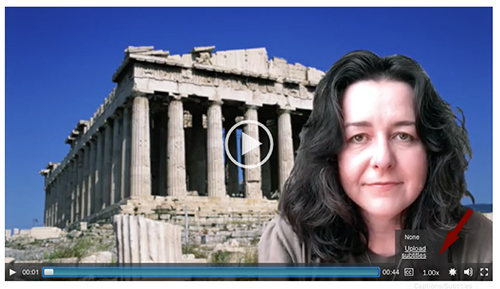
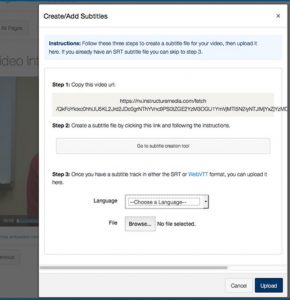
- Click the button and you have the option to “upload subtitles.”
- In the box that comes up, follow steps 1 and 2 first. You’ll have to sign in with Google or Facebook to use the product, which is called Amara.
You will upload your video to Amara, and then be directed to an interface where you can listen to your video as you type in captions. Then you can sync the captions with the video and save your file.
CANVAS ACCESSIBILITY CHECKER
Now that you’ve modified your content based on the suggestions provided, you can check your Canvas Pages with the Canvas Accessibility Checker. The Accessibility Checker is located in the Rich Content Editor menu bar. Depending on the size of the browser window, users may have to scroll the menu bar horizontally to view the Accessibility Checker icon.
The Accessibility Checker verifies attributes within the editor and you on common accessibility errors. The Accessibility Checker provides a user-friendly explanation about any errors and provides the fields or menus needed to fix the error. The explanation also provides a link to additional resources to educate content creators about the accessibility guideline.
This tool verifies the following accessibility rules:
- Large text contrast: Text larger than 18pt (or bold 14pt) should display a minimum contrast ratio of 3:1.
- Small text contrast: Text smaller than 18pt (or bold 14pt) should display a minimum contrast ratio of 4.5:1.
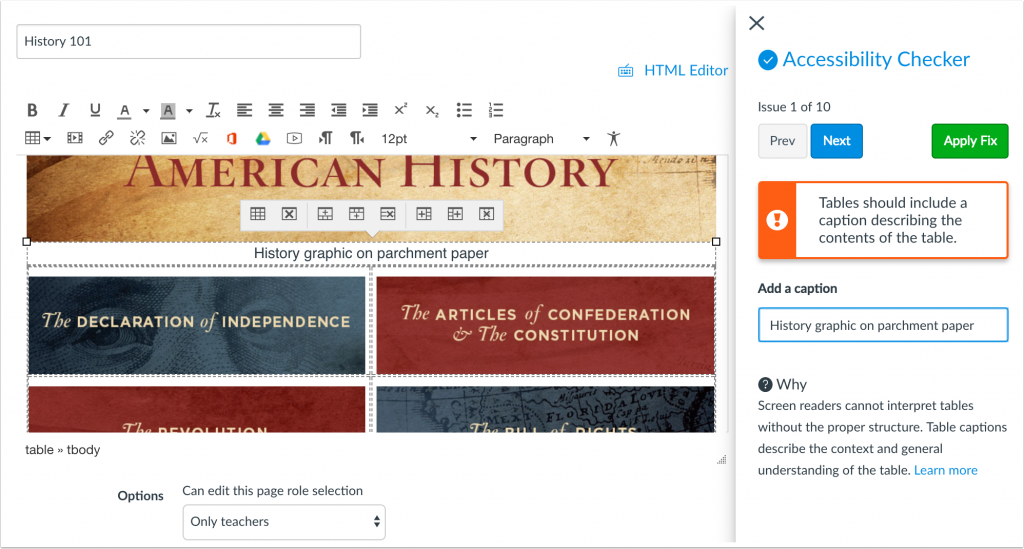
- Table captions: Tables should include a caption describing the contents of the table.
- Table header scope: Tables headers should specify scope and the appropriate structure.
- Table header: Tables should include at least one header.
- Sequential headings: Heading levels should not be skipped.
- Heading paragraphs: Headings should not contain more than 120 characters.
- Image alt text: Images should include an alt attribute describing the image content.
- Image alt filename: Image filenames should not be used as the alt attribute describing the image content.
- Image alt length: Alt attribute text should not contain more than 120 characters.
- Adjacent links: Adjacent links with the same URL should be a single link.
Summary
Strategies
Accessibility compliance can be a complicated topic, but you don’t have to limit your online course to plain text- the key is to plan ahead. You can use the the instructions provided on this site to retroactively make a course compliant, however using this site to help plan in advance will in particular make new course creation much easier. My advice is to not limit the types of content and methods of presentation you use, but rather choose the content type most appropriate for the information you are presenting. For example, PowerPoint slides may require several steps to make them compliant, compounded by the number of slides in the presentation. You need not eliminate PowerPoint presentations from your course, but rather limit them to times when that is the best way to present the material, and consider deleting slides that are redundant to information already presented elsewhere. Similarly, video captioning can take time and/or money, so either use the streaming media services provided by the Library or, when that is not possible, limit your video clips to the shortest length needed to convey the required information. Below are some more specific tips and summary comments:
Syllabus: Provide a statement for students on how to register with the OARS office; be mindful of universal design when wording your learning objectives.
Text and Links: Use built-in formatting tools such as headers and lists; don’t rely on colors and tables to convey information; limit the number of external links/resources you provide- links require a lot of extra text for screen readers, and can also take up your time with monitoring for dead links; also, you cannot control the accessibility compliance for external sites
PDF, Word, and PowerPoint: Follow the same guidelines for text; create PDF files from digital documents instead of scanning hard copies; use templates for layout; use Acrobat Pro accessibility tools
Images: Add meaningful “alt” text; if the information conveyed in the image is already described in your text, the image can be considered decorative; if an image conveys more complicated/detailed information, consider typing the description in your main text so that all students can benefit
Quizzes: Follow same guidelines for text and images if used in quizzes; Use “Moderate this Quiz” to grant additional time for students on timed quizzes
Video: Video must be captioned and ideally should have a transcript if detailed descriptions are needed; make use of the Library’s streaming media catalogue whenever possible
Accessibility Checker: Use the Accessibility Checker for all information presented via the visual content editor in Canvas
ADDITIONAL RESOURCES
- Instructure: General Accessibility Guidelines
- Information on Accessibility in Canvas
- UNCG Internet Oversight Committee’s Accessibility Guidelines
- Assistive Technology:
- Office of Accessibility Resources & Services
Contact your Instructional Technology Consultant for more specific course assistance.
Resources:
- U.S. Department of Education, National Center for Education Statistics. (2016). Digest of Education Statistics, 2014 (NCES 2016-006), Table 311.10.
- Tobin, T.J., & Behling, K. T. (2018). Reach Everyone, Teach Everyone: Universal Design for Learning in Higher Education, Morgantown, WV: West Virginia University Press.
More Training
105 Foust Building
P.O. Box 26170
Greensboro, NC 27402